2. Aan de slag
2.1. Installing Mixxx
After downloading Mixxx from our Website, you need to install it on your computer.
- Windows
Double-click the Mixxx installation file and go through the installation wizard.
- macOS
Double-click the Mixxx .dmg file and drag the Mixxx icon to your Applications folder.
- Linux
No steps are necessary after you followed the instructions on the download page.
2.2. Upgrading Mixxx
You may safely install Mixxx on top of any previous version. You don’t need to uninstall the old version.
Your settings and library will not be removed or reset, but they may be upgraded when you launch the new version of Mixxx. Note that we do not guarantee that new configurations will work on older versions of Mixxx, therefore you may want to make a backup of your existing settings just in case.
For locations in each supported OS as well as detailed descriptions of the settings files, go to The Mixxx Settings Directory.
2.3. Mixxx openen
![]() Once you’ve installed Mixxx, start by
opening Mixxx and importing your music to the Mixxx library.
Once you’ve installed Mixxx, start by
opening Mixxx and importing your music to the Mixxx library.
- Windows
Dubbelklik op het Mixxx-icoon op het bureaublad. U kunt ook door het startmenu van Windows bladeren en op het pictogram Mixxx klikken, of zoeken naar
Mixxx.exe.- macOS
Dubbelklik op het pictogram Mixxx in de map
Applications. U kunt ook het Mixxx-icoontje naar het dock slepen en daar dubbelklikken of in Spotlight zoeken naar mixxx.- GNU/Linux
Klik op het Mixxx-icoontje in het applicatiemenu of op de launcher van uw bureaubladomgeving of zoek naar
mixxx. U kunt ook mixxx in de terminal typen en dan op Return drukken. Als uw audio interface niet toegankelijk is vanuit Mixxx omdat deze door andere toepassingen via PulseAudio wordt gebruikt, kunt u Mixxx sluiten en herstarten met pasuspender mixxx. Zie appendix-command-line-opties voor een overzicht van de opdrachtregelopties van Mixxx.
2.4. Je audiobestanden importeren

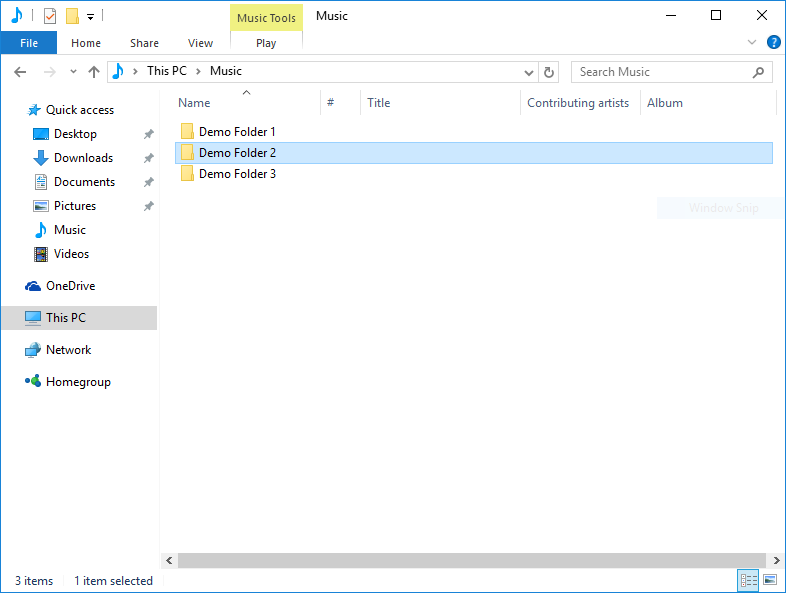
Mixxx draait op Windows 10 - Kies het dialoogvenster van de muziekbibliotheek
De eerste keer dat u Mixxx start, wordt u gevraagd een directory te selecteren waarin uw muziek is opgeslagen. Standaard verwijst het dialoogvenster naar een locatie waar doorgaans muziekbestanden worden bewaard, maar u kunt elke locatie op uw computer selecteren.
Klik op Select Folder en Mixxx zal uw muziekbibliotheek scannen. Afhankelijk van de grootte van uw bibliotheek kan dit enige tijd duren. Alle ondersteunde muziekbestanden die Mixxx detecteert worden in de Tracks - Bekijk en bewerk je hele verzameling vermeld.
Als u uw bibliotheek wilt bijwerken (bijvoorbeeld omdat u bestanden hebt toegevoegd of verplaatst), kunt u dit doen met :menuselectie:`Bibliotheek --> Scan Bibliotheek Opnieuw` in het menu. Als u bij elke start opnieuw wilt scannen, selecteert u :menuselectie:`Voorkeuren --> Bibliotheek --> Opnieuw Scannen bij opstarten`.
Waarschuwing
In Windows 7 en 8 wijst het importdialoogvenster naar uw Windows “Muziek”-bibliotheek, een speciale virtuele map. U kunt deze virtuele mappen niet gebruiken. Selecteer in plaats daarvan een gewone map, meestal “Mijn Muziek”, zoals hierboven afgebeeld.
2.5. Analyseer je bibliotheek
 Mixxx automatically analyzes tracks the first time you load
them in a deck. This allows you to run beatgrid, key, and ReplayGain detection on tracks in advance. It also prepares the waveform overviews, detects file corruption, and calculates the BPM values.
Zie ook
Voor meer informatie, ga naar configuratie-bpm-detectie.
Why you should analyze your audio files
If the tracks have never been played with Mixxx before, the library columns BPM, Duration and Key will be empty or unreliable (because the values are just read from the file’s tags if present and might be wrong). Pre-generating beatgrids gives you the chance to double-check the beat markers to make sure they are correct. Errors in beatgrids can cause difficulty when syncing tracks. Furthermore, track analysis takes considerable CPU power and might cause skips in the audio — things you surely don’t need while performing.
How to analyze your audio files
Once you have imported your music library, press OK on the Preferences window.
Go to the Analyze view on the left side panel of the library.
To analyze a few specific tracks, hold down the Ctrl button, and select the tracks that you want to analyze or you can shift-select a range of tracks. Once they’ve been highlighted, click the Analyze button on the top right of the library section.
To analyze the newly added tracks, toggle the New label and then click Analyze.
To analyze the entire library, toggle the All label and then click Analyze.
The New and All toggle buttons are located at the top left of the analysis pane - just above the Preview and Cover Art column titles of the library.
While analyzing, the progress in percentage and total queue length are shown.
2.6. Configuratie van de geluidsingang en -uitgang
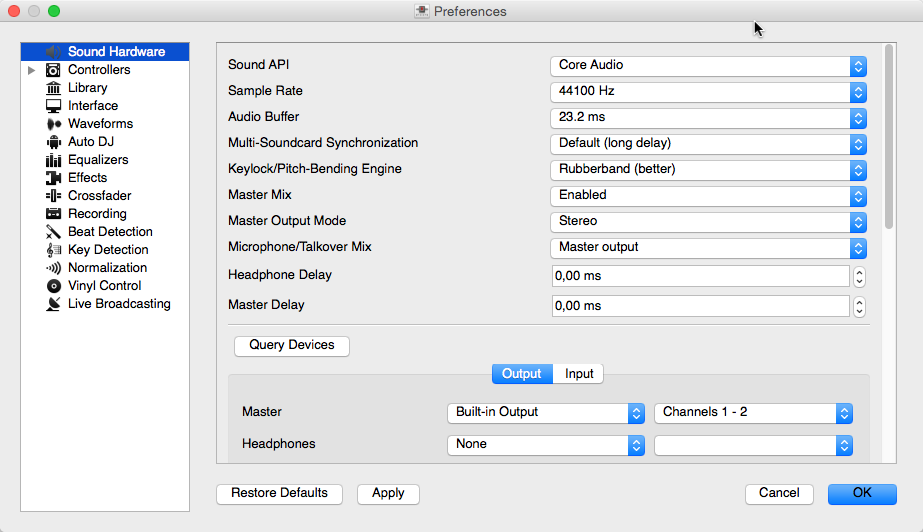
Vooraleer u Mixxx kunt gaan gebruiken, moet u Mixxx configureren om uw geluidshardware te gebruiken in: menuselectie: Voorkeuren -> Geluidsapparatuur. U hoeft niet alle in- en uitgangen te configureren.
Het hoofdstuk: ref: hardware legt verschillende soorten DJ-hardware uit en hoe u deze kunt instellen met de in- en uitgangopties. Om Mixxx optimaal te laten presteren op uw systeem, configureert u de andere: ref: voorkeuren-geluid-hardware voorkeuren naast de in- en uitgangen.

Voorkeuren Mixxx Geluidsapparatuur
Uitgang opties
Intern mixen:
Gebruik deze uitgangen als u geen :ref:`externe mengtafel <hardware-mixers> ` gebruikt. Als u een controller met een ingebouwde audio-interface gebruikt, gebruik dan deze uitgangen.
Master: alle decks, samplers, microfoons en aux-ingangen samen gemengd. Deze output wordt naar de sprekers gestuurd voor het publiek.
Hoofdtelefoon: alle decks, samplers, microfoons en aux-ingangen toegewezen aan: term: pre-fader beluistering <PFL>
Booth: zelfde als output, maar heeft een aparte versterkingsregeling
Extern mixen:
Decks 1-4: de afzonderlijke ongemengde decks die naar een extern mengpaneel worden gestuurd.
Bus Left/Center/Right: all decks, samplers, and auxiliary inputs assigned to each side of Mixxx’s crossfader
Input Opties
Intern mixen:
Gebruik deze ingangen als u geen extern me,gpaneel gebruikt. Als u een controller met een ingebouwde audio-interface gebruikt, gebruik dan deze ingangen.
Microfoon 1-4: live microfoon- of ingangen voor muziekinstrumenten
Auxiliary 1-4: andere geluidsbronnen
Extern mixen:
Record/Broadcast: Wanneer dit is geconfigureerd, zal Mixxx opnemen en uitzenden vanaf deze audio-interface-ingang in plaats van de interne master-mix. Als u een microfoon op de mixer hebt aangesloten, configureer dan niet de microfoon 1-4 ingangen.
Intern of extern mixen:
Vinyl Control 1-4: tijdcode-invoer van draaitafels of CDJ’s voor het manipuleren van decks 1-4
Zie ook
microfoons