3. Hardware-Setup
This chapter describes the most common hardware setups to serve as examples. We will go over the setup of soundcards, controllers, and timecode records/CDs.
Headphone cueing, or just cueing, is a crucial aspect of DJing that separates DJing from merely making a playlist. Headphone cueing allows you to preview the next track you would like to mix in your headphones. The audience will not hear what you are cueing in your headphones until you decide to mix it in.
In order to use headphone cueing, you will need at least 2 separate audio outputs, typically provided by a USB soundcard (also known as an “audio interface”). The headphone jack on most laptops is not a second audio output. Rather, plugging headphones into the jack simply redirects the laptop’s single stereo output from its speakers to your headphones. A splitter cable can be used to separate the stereo output of a headphone jack into two separate mono outputs for headphone cueing, but it is recommended to use a sound card with at least four mono outputs (for two stereo pairs). Such sound cards tend to be higher quality than those built into laptops and allow your mix to be enjoyed in stereo by your audience.
Unlike some proprietary DJ systems, Mixxx can use any soundcard and any MIDI or HID controller that your OS has drivers to use. Mixxx can use multiple audio devices simultaneously. Depending on your budget and application area, your sound setup and requirements may vary. This section provides useful information for club, hobby, and radio DJs alike.
Siehe auch
The Mixxx DJ Hardware Guide lists controllers and sound cards with information about their compatibility with Mixxx and different operating systems. It also has suggestions for what to consider when you are shopping for DJ equipment.
3.1. Nur Laptop
Verwendung von Mixxx mit einer integrierten Soundkarte
There is no need to buy any equipment other than a computer if you do not require headphone cueing. The built-in soundcard on most computers and laptops comes with a single stereo line-out and a microphone input.
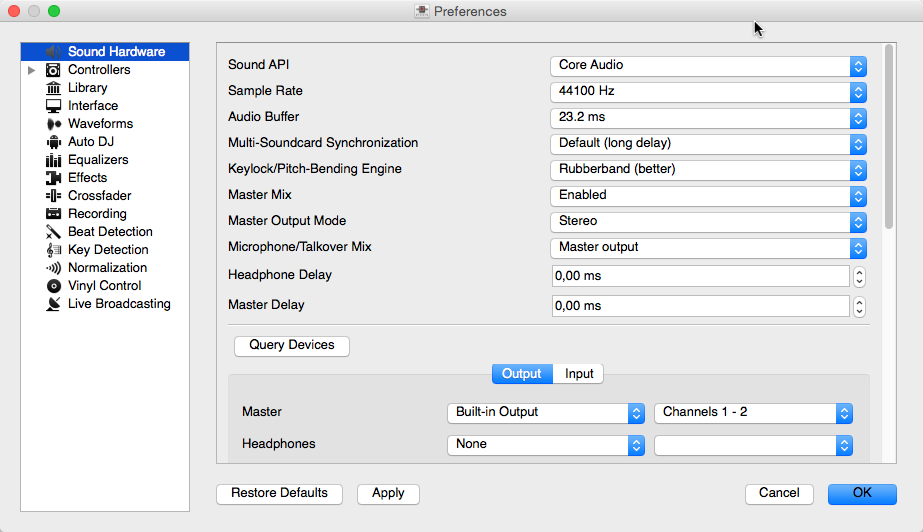
Die Abbildung oben zeigt, wie die Sound-Konfiguration aussehen könnte. Der Stereo-Ausgang der Soundkarte (Kanäle 1-2) werden an den Master-Ausgang angeschlossen.
öffnen
Wähle die Ausgabe Registerkarte
From the Master drop-down menu, select your built-in soundcard, then Channels 1-2
Je nach Soundkarte kannst Du ein Mikrofon festlegen
Verwende das eingebaute Mikrofon oder schließe ein Mikrofon an den Computer an
Überprüfe, dass das Mikrofon von Deinem Betriebssystem erkannt wird
Die :guilabel:‘Eingang‘-Registerkarte öffnen
Wähle den vom Mikrofon verwendeten Eingang im Mikrofon Auswahlmenü
Klicke auf :guilabel:‘Anwenden‘, um die Änderungen zu speichern.
This minimal configuration may be suitable for radio DJs who do not need headphone cueing.
3.2. Laptop and Splitter Cable
The cheapest way to DJ and cue with headphones uses a stereo-to-mono DJ splitter cable (also known as a “Y cable”) plugged into the headphone jack of a laptop or other computer. This cable divides the stereo output from a single jack into two separate mono signals.
This setup allows you to start DJing without having to invest in expensive equipment. However, your audience will not be able to enjoy music producers‘ artistic use of stereophonic sound (although many club PA systems are wired in mono anyway). Furthermore, soundcards built into computers are usually low quality.
Using a built-in soundcard and a stereo-to-mono splitter
öffnen
Wähle die Ausgabe Registerkarte
Check that your headphones are plugged into the side of the cable with a headphones symbol and that the speakers are plugged into the side of the cable with a speaker symbol.
From the Master drop-down menu, select your built-in soundcard, then Channel 1
From the Headphones drop-down menu, select your built-in soundcard, then Channel 2
Klicke auf :guilabel:‘Anwenden‘, um die Änderungen zu speichern.
Siehe auch
See the wiki for a list of DJ splitter cables.
Warnung
Most splitter cables, particularly those marketed as headphone splitter cables, output the same stereo signal to two headphone jacks and will not work for this DJ setup. Also, if you use a generic stereo-to-mono splitter adapter, you may only be able to hear out of one side of your speakers and headphones. DJ splitter cables allow you to hear the same mono signal on both sides of your headphones and speakers.
3.3. Laptop and External USB Soundcard
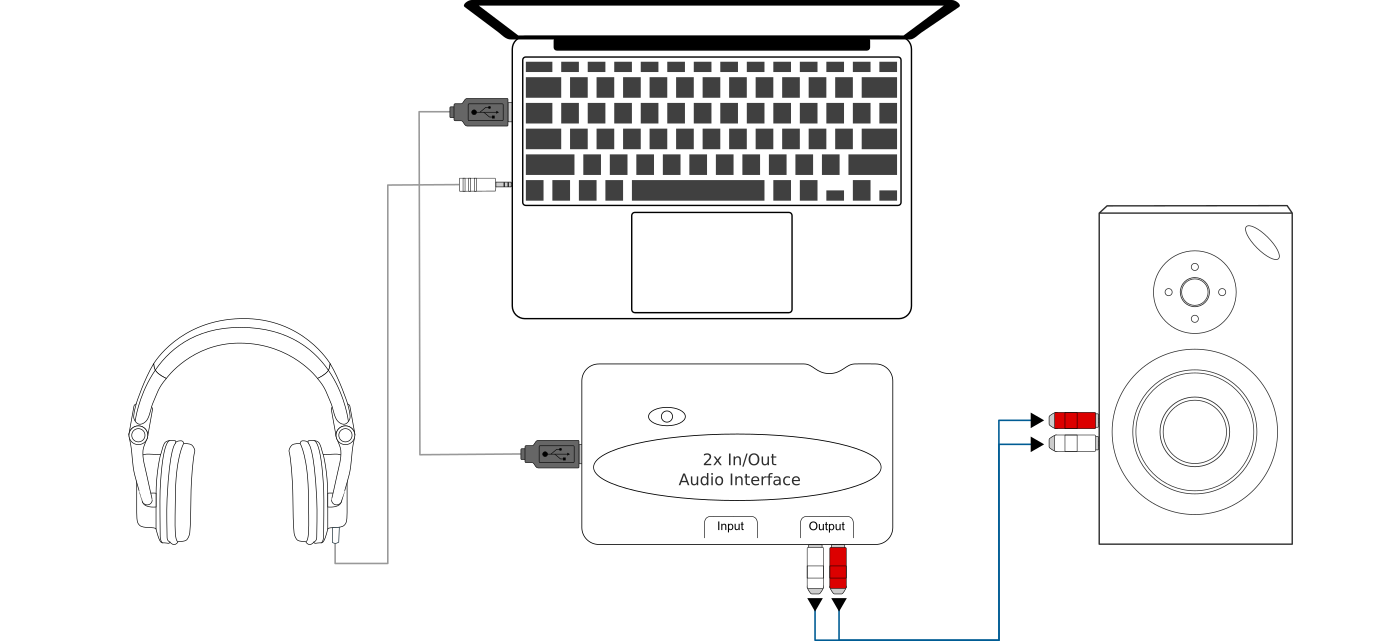
Mixxx mit einer externen Soundkarte benutzen
The most common setup for DJing is a laptop and a soundcard with 2 stereo outputs (4 channels). The first stereo output (channels 1-2) is used as the master output and supplies the main mix to the audience. With the second stereo output (channels 3-4) you can cue and preview the next track in your headphones. If your soundcard only has one stereo output, you can use multiple soundcards to achieve a similar setup. Most DJ controllers above the most basic models include a soundcard with 2 stereo outputs (see Laptop and MIDI or HID Controller for details).
The configuration depicted above uses two soundcards. This setup is the bare minimum for serious DJing. Without any extra gear, the DJ can control Mixxx via mouse and keyboard. For more information see Controlling Mixxx.
Verwendung zweier Soundkarten (integrierte + externe)
öffnen
Wähle die Ausgabe Registerkarte
From the Master drop-down menu, select the external soundcard, then Channels 1-2
From the Headphones drop-down menu, select the built-in soundcard, then Channels 1-2
Klicke auf :guilabel:‘Anwenden‘, um die Änderungen zu speichern.
Unter Verwendung einer externen Mehrkanal-Soundkarte
öffnen
Wähle die Ausgabe Registerkarte
From the Master drop-down menu, select the external soundcard, then Channels 1-2
From the Headphones drop-down menu, select the external soundcard, then Channels 3-4
Klicke auf :guilabel:‘Anwenden‘, um die Änderungen zu speichern.
Hinweis
If you have technical difficulties with your external sound card, a splitter cable can be used as a portable, inexpensive backup.
Bemerkung
Soundcards designed and marketed for recording often have a knob that allows you to mix its input directly with its output. This function can be helpful when recording (to hear the input without the latency of going through the computer), but the master output level will be low even if there is no sound on the inputs. To get the maximum output level from these soundcards, you may need to set this knob to only send output from the computer and none from the input(s).
3.4. Laptop and MIDI or HID Controller
Most DJs prefer the tactile and intuitive control provided by DJ MIDI or HID controllers over only a keyboard and mouse. Mixxx can work with any MIDI or HID controller as long as there is a mapping file to tell Mixxx how to understand the controller’s signals. Mixxx comes bundled with a number of MIDI and HID mapping presets, which are listed in the Mixxx DJ Hardware Guide on the wiki. For controllers that Mixxx does not yet support, you can search the forum to see if anyone has started a mapping. You can also start one yourself using the information in the Controller Mapping Documentation on the wiki.
3.4.1. Controllers with an integrated soundcard
Many DJ controllers include an integrated multi-channel soundcard. A setup with this kind of controller may look like the diagram below:
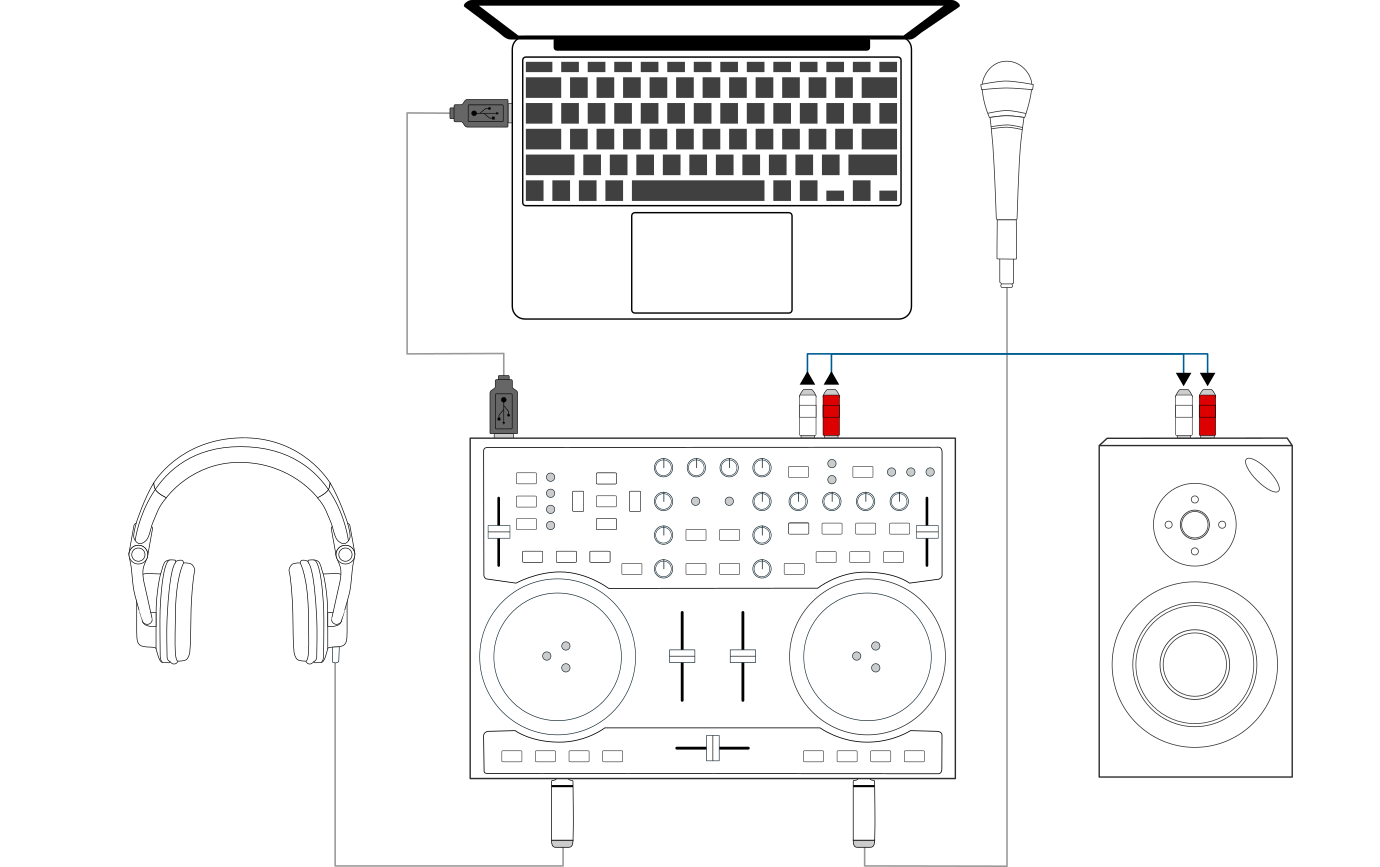
Using Mixxx together with a DJ controller and integrated soundcard
Unter Verwendung eines Controllers mit einer integrierten Mehrkanal-Soundkarte
öffnen
Wähle die Ausgabe Registerkarte
From the Master drop-down menu, select your controller’s soundcard, then Channels 1-2
From the Headphones drop-down menu, select your controller’s soundcard, then Channels 3-4
Klicke auf :guilabel:‘Anwenden‘, um die Änderungen zu speichern.
3.4.2. Controllers without an integrated sound card
Controllers without an integrated soundcard can be used together with a USB soundcard as depicted in the diagram below:
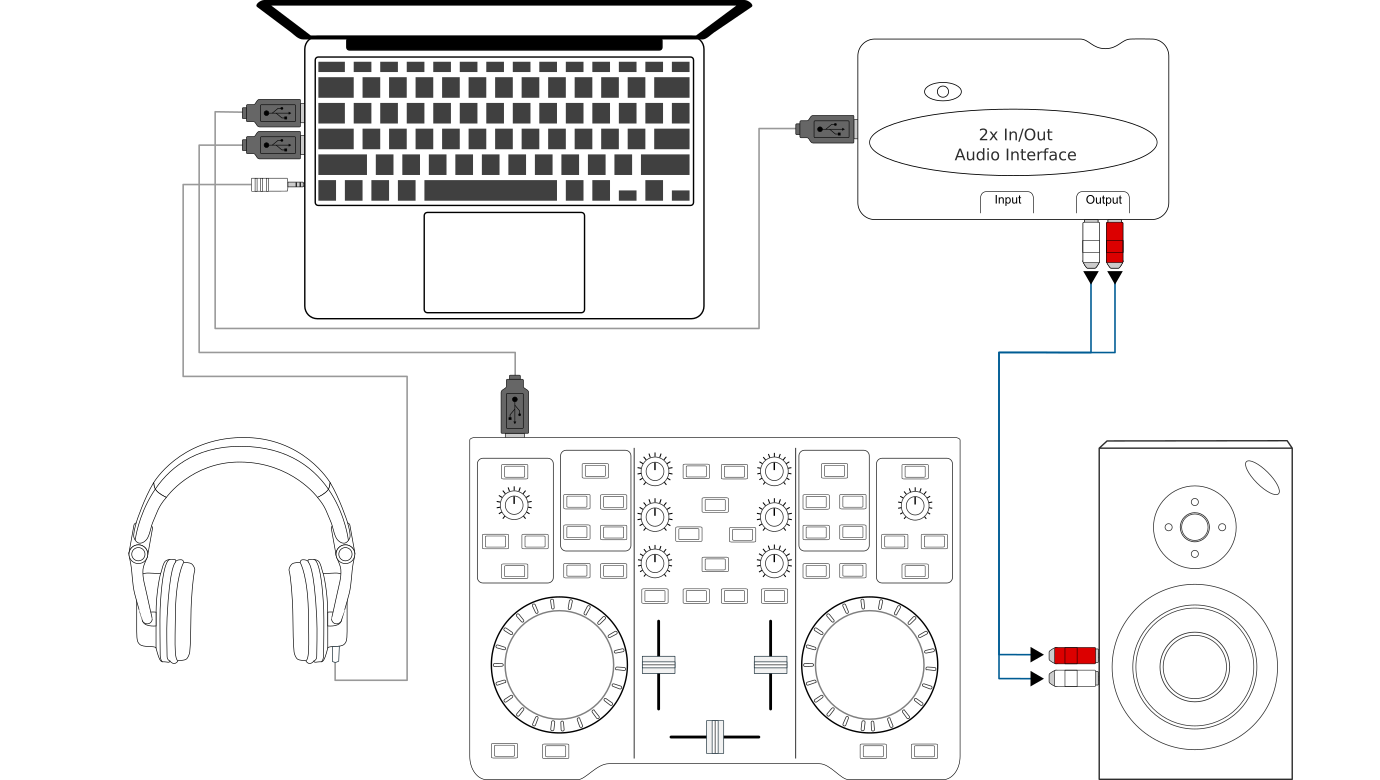
Using Mixxx together with a DJ controller and external soundcard
Using a controller without an integrated soundcard
öffnen
Wähle die Ausgabe Registerkarte
From the Master drop-down menu, select the external soundcard, then Channels 1-2
From the Headphones drop-down menu, select the built-in soundcard, then Channels 1-2
Klicke auf :guilabel:‘Anwenden‘, um die Änderungen zu speichern.
Bemerkung
You can connect as many controllers as you have ports on your computer. Just follow the steps in Using MIDI/HID Controllers for each controller you want to use.
3.5. Laptop, externe Hardware-Mixer und Vinyl-Steuerung
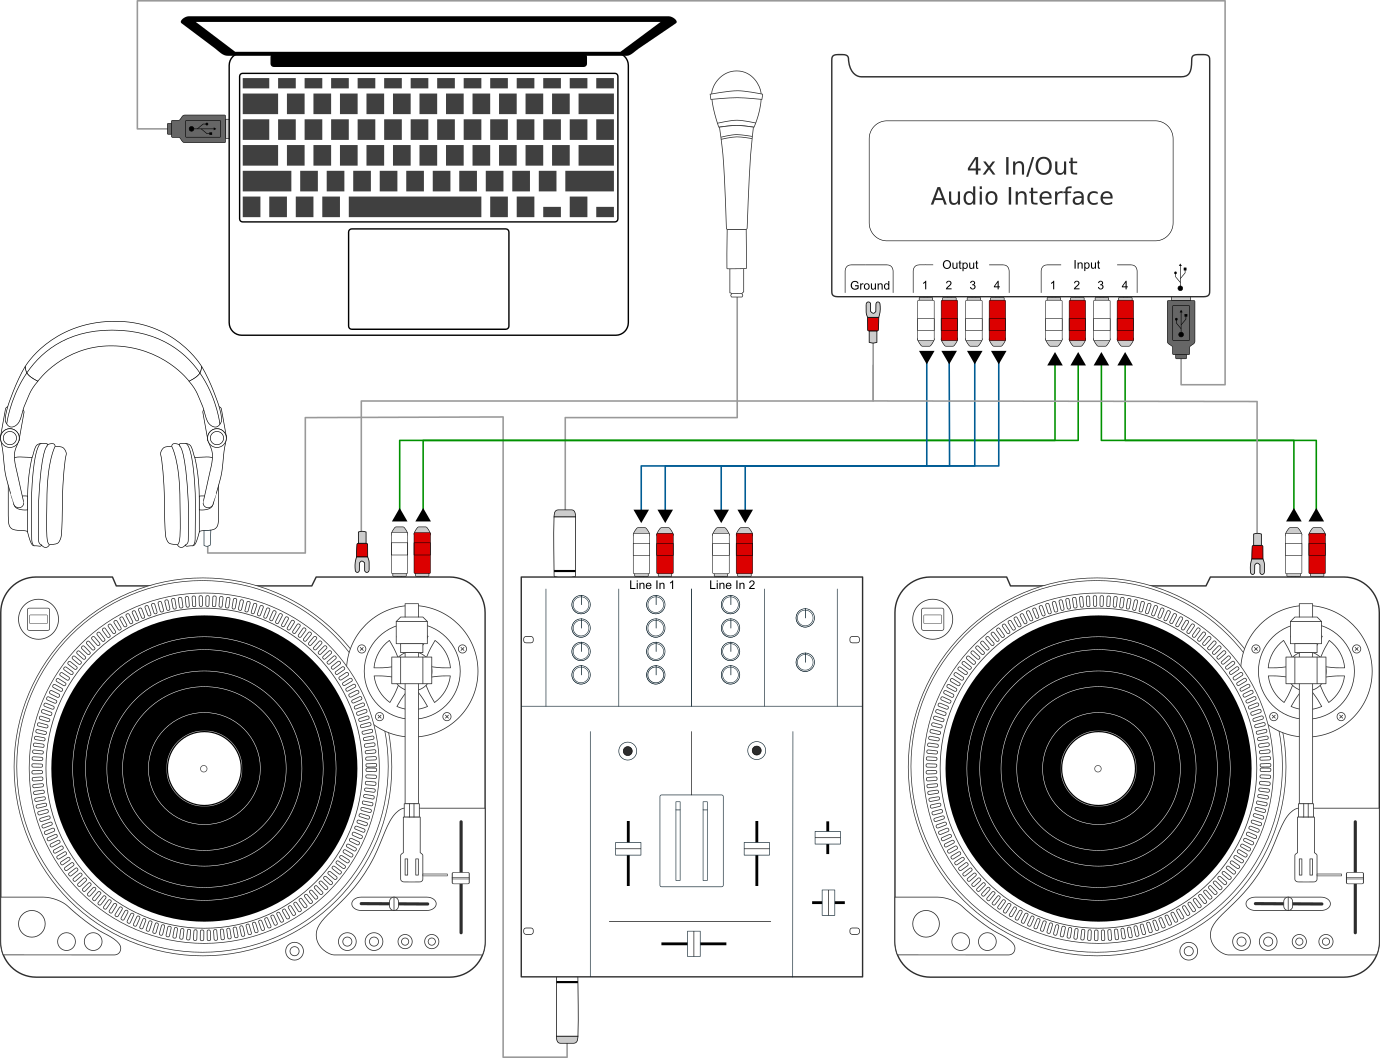
Using Mixxx together with turntables and external mixer
This setup allows DJs to use the techniques of DJing with vinyl record turntables combined with the portability and flexibility of a laptop computer. Instead of carrying crates of records or CDs, DJs can carry their entire music collection on their laptop. In addition to a laptop and headphones, this setup requires a soundcard with at least two pairs of stereo inputs and outputs as well as a pair of timecode records.
Siehe auch
Gehen Sie zum Kapitel Vinyl-Steuerung für ausführliche Informationen.